Remodeling your home or adding a fresh touch to your living space can be both exciting and challenging. One of the easiest and most versatile ways to revamp your walls is by using peel-and-stick wallpapers. Unlike traditional wallpapers or painting, peel-and-stick wallpapers offer a hassle-free, mess-free, and budget-friendly alternative. I recently stumbled upon Spoonflower Peel and Stick Wallpapers, and I have been blown away by their quality and stunning designs. In this blog post, I’ll share my experience with peel-and-stick wallpapers, introduce you to Spoonflower, and showcase five of my favorite wallpapers from their collection.
5 Stunning Spoonflower Peel And Stick Wallpapers To Transform Your Space
What Is Spoonflower?
If you’re not familiar with Spoonflower, let me introduce you to this amazing company. Based in North Carolina, Spoonflower is a print-on-demand platform known for its fabric wallpaper and custom designs. They sell wallpaper, fabric, gift wrap, and other home decor items, allowing designers and customers to create unique products with their prints. One of the things that sets Spoonflower apart is their commitment to independent fabric designers and supporting the community through design challenges and competitions. Their peel-and-stick wallpapers are made from high-quality materials, featuring water-based inks and eco-friendly production methods.
Is Spoonflower Worth It?
In my opinion, Spoonflower is absolutely worth it! Their peel-and-stick wallpapers are not only stunning but also easy to install and remove. They give your space a luxurious and personalized touch, making it stand out and reflect your unique style. Whether you’re looking for a calming and serene vibe or a bold and vibrant atmosphere, Spoonflower has something for everyone.
How To Install Spoonflower Peel And Stick Wallpaper
Installing Spoonflower Peel and Stick Wallpaper is a breeze. Here are the steps to get you started:
Prepare Your Wall: Make sure your wall is clean, smooth, and free of any dust or debris. If needed, patch up any holes or imperfections.
Measure and Cut: Measure the height of your wall and cut the wallpaper accordingly, adding a few extra inches at the top and bottom for adjustments.
Peel Off Backing: Slowly peel off the backing of the wallpaper, starting from the top, as you press the wallpaper onto the wall. Smooth out any air bubbles as you go.
Align the Pattern: If your wallpaper has a repeating pattern, take extra care to align it properly. This will ensure a seamless look.
Trim Excess: Once the wallpaper is applied, use a sharp utility knife to trim off the excess material from the top and bottom.
5 Spoonflower Peel And Stick Wallpapers
1. Sunlit Blooms: This wallpaper features a beautiful floral design with a soft color palette, perfect for a cozy and inviting space. The delicate blooms bring a touch of nature indoors, creating a tranquil atmosphere.
2. Geometric Illusions: For those who prefer a modern and bold look, this wallpaper is a winner. The striking geometric pattern in vibrant hues adds a pop of energy to any room.
3. Dreamy Watercolor: Embrace a dreamy ambiance with this watercolor-inspired wallpaper. The subtle blend of pastel shades creates a soothing and calming vibe.
4. Tropical Oasis: Transport yourself to a tropical paradise with this wallpaper. The lush green leaves and vibrant flowers instantly infuse a sense of relaxation and holiday vibes.
5. Cosmic Adventure: Spark your imagination with this cosmic-themed wallpaper. The mesmerizing starry night sky adds a sense of wonder and magic to your space.
How To Remove Spoonflower Peel And Stick Wallpaper
When it’s time to update your space or try a new design, removing Spoonflower Peel and Stick Wallpaper is just as easy as installing it. Here are the steps:
Start from a Corner: Find a corner of the wallpaper and gently peel it back. If you encounter resistance, use a hairdryer to heat the wallpaper slightly, making it easier to remove.
Peel Slowly: Carefully peel the wallpaper off the wall, ensuring not to damage the underlying surface.
Remove Residue: If there’s any adhesive residue left on the wall, use a mild adhesive remover or warm, soapy water to clean it off.
Prepare for Reinstallation: If you plan to install new wallpaper, make sure to prepare your wall by cleaning and smoothing it before applying the new design.
Spoonflower Peel and Stick Wallpaper: Elevate Your Space
In conclusion, using peel-and-stick wallpapers is an excellent way to remodel and add a fresh touch to your home. Spoonflower, with its vast collection of beautiful designs and commitment to sustainability, is a go-to choice for anyone looking to transform their space. Whether you’re a DIY enthusiast, a parent-to-be, or simply someone who wants a change in their home, Spoonflower has something for everyone.
So, don’t wait any longer. Start exploring the stunning collection of Spoonflower Peel and Stick Wallpapers, and turn your living space into a luxurious and personalized haven. Happy decorating!
Your living space reflects your personality and plays a significant role in setting the mood and atmosphere of your home. Sometimes, however, you might find yourself craving a change—a different vibe that better aligns with your current tastes and preferences. The good news is that transforming your space to suit a new aesthetic doesn’t have to break the bank. In this article, we will explore five easy and affordable ways to change your space on a budget for a fresh look and create a different vibe.
5 Easy Ways to Change Your Space on a Budget to Fit a Different Vibe
1. Change the Paint Color:
One of the most effective and inexpensive ways to transform any space is by changing the paint color. Paint has the power to completely alter the ambiance of a room, making it feel vibrant, cozy, or sophisticated. When selecting a new color, consider the atmosphere you want to create. Warm tones like terracotta or mustard yellow can add a cozy and inviting feel. While cool blues or greens can provide a refreshing and calming effect. Opting for neutral shades like beige or gray allows for versatility and provides a backdrop for accentuating other elements in the room.
2. Create a Feature Wall with Paint or Wallpaper:
If you want to make a bold statement without committing to changing the entire room, creating a feature wall is an excellent option. This technique involves highlighting a single wall with a different paint color. Or using wallpaper to add texture, pattern, or even a mural. A feature wall can instantly transform the look and feel of a space, becoming a focal point that adds character and personality. Choose a wall that naturally draws attention. Such as the one behind a bed, sofa, or fireplace, and let your creativity run wild.
3. Clutter Clear the Space and Donate Decor and Things That No Longer Feel Right:
To create a new vibe, it’s important to declutter your space and let go of items that no longer align with your desired aesthetic. Start by evaluating your belongings and consider donating or selling items that you no longer need or resonate with. This step not only helps you clear physical clutter but also declutters your mind, allowing you to focus on the new vibe you want to create. By letting go of unnecessary items, you’ll have more space to curate a cohesive and intentional aesthetic.
4. Move the Furniture Around or Take Out Items That No Longer Fit the Feel of the Space:
Sometimes, all it takes is a fresh arrangement of furniture to completely transform the energy of a room. Experiment with different layouts and positions to create a better flow and maximize the functionality of your space. If certain furniture pieces no longer fit the feel you’re trying to achieve, consider repurposing them in other rooms or donating them to someone who will appreciate them. Removing unnecessary items can breathe new life into a space. And make room for new additions that align with your desired vibe.
5. Incorporate Affordable Accessories and Statement Pieces:
Once you’ve made the foundational changes to your space, it’s time to add the finishing touches. Accessories and statement pieces can make a significant impact on the overall vibe of a room without breaking the bank. Look for affordable options like decorative pillows, rugs, curtains, artwork, or plants that complement your desired aesthetic. These small additions can inject personality and create the desired ambiance, tying the entire room together.
Transforming your space to fit a different vibe doesn’t have to be a costly endeavor. By implementing these five easy and affordable tips, you can breathe new life into your living space without emptying your wallet. Whether you choose to change the paint color, create a feature wall, declutter, rearrange furniture, or add accessories, remember that the goal is to create an environment that aligns with your current tastes and preferences. Let your creativity flow, and enjoy the process of transformingyour space into a haven that truly reflects your unique style and personality.
Everywhere you turn, business and homes have people creating a feature wall and some make it look easy. Others make it look incredibly difficult and unattainable.
I’m here to tell you, it’s really easy to create a feature wall that will have others wanting to come take all the pictures! All it takes is a little wallpaper, a bit of patience, and a love to see something different. I will tell you ahead of time, not all wallpaper is created the same. And can cause several curse words to get the perfect look if you aren’t careful!
How to Easily Create a Feature Wall
My vision and dream was to create a wall and space in our Short Term rental property which made people feel like they were in an Instagram or blogging scene every day they wake up. I wanted it to look boho and islandy, and beachy, yet still comfortable. I knew I wanted to include wallpaper, palm tree frawn, wicker, and several plants. Because it is a short-term rental and I can’t expect my guests to water the plants. So I knew fake plants were going to be the way. And honestly, when doing home decor, the most low maintenance is often the easiest focal point to create.
I had a color scheme of green, white, and copper in my mind, and even mixed in a bit of blue and brown for the wicker color. What I didn’t plan on adding but realized they worked so well were pink flowers, and a yellow polka dot pot. It’s important to have coordinating colors in small spaces to not overwhelm the rest of the room or home.
This room has another end that has completely different accent walls and is right off the living room making it important to have fun but coordinating living spaces, even if you don’t see it in these photos. If you’ve been thinking of doing the same, here’s how to add a feature wall.
Feature Wall Wallpaper
Wallpaper has come a long way since I was a kid back in the 90s when wallpaper was at an all-time high in popularity. The wallpaper feature I remember was at the top of the ceiling in a thin strip down the wall. Or above the chair rail. Not often did you see an entire wall or a single wall covered floor to ceiling in wallpaper.
Things have changed quite a bit. Many people are using wallpaper to create beautiful experiences in their homes and entire walls as I did on a few walls in our short-term rental. A good wallpaper today can feel like a real piece of art.
Peel And Stick Wallpaper
I chose to use a peel and stick paper instead of one that needed paste or something complicated. Because this was my first time working with wallpaper, I wanted something that could remove and restick if it wasn’t right the first time.
I also chose the peel and stick in case I ended up not liking it and I would be able to remove it easily. If you need to remove wallpaper and restick it, you can get the adhesive to help keep more stickiness if it’s gone. This is the best pro tip I could give you, because after all, applying wallpaper takes real practice!
My favorite brand was Scott Living by the Scott Brothers. It was super easy to work with, had good repeating patterns, and had enough stickiness if I needed to remove and fix. This is the exact one I used on this wall. My next favorite is NextWall and it was a bit harder to work with when I needed to move and manipulate it. The least favorite was the Opalhouse line by Target. It is hard to work with, not easy to pull up and reapply. But I figured it out after a while.
This photo shows this chair, but I’ve moved it somewhere else in the house 🙂
Feature Wall Accessories
Once you decide what wallpaper and which wall you want to create, apply the wallpaper completely. Depending on the vibe you are trying to create, choose where you want to put your accessories like plants, flowers, chairs, etc. Because I was creating a corner and space, I didn’t add anything to the feature wall other than a window cling of colored palm prints. If you want to let the light in, it’s not necessary to do the window film like I did, however, I think it pops even more. Here’s the one I used.
I then added a hanging boho chair a bit in front of the wall for people to sit and have a moment. Little side note about this chair – I actually bought it back in January of 2018 and never hung it. It sat in the box until I opened it to hang in this spot. Guess it was just meant to be here all along and I didn’t know it! If you don’t have a large beam lying around, make sure you grab this hanging set. And ensure you find a stud to hang on so it doesn’t fall down.
On the opposite side of the room, I spaced out floral rings and hung a boho print from a local artisan here in Arizona along with my fake succulents. Remember to choose accessories of all shapes, sizes, and colors to really bring the wall together and draw attention to the cool vibe.
I finished the feature area off with a table I spray painted green from white. Added a few plants to the table, a little pineapple basket, a smaller basket with a throw blanket. A DIY copper spray painted palm frawn, a cute pillow from Ikea, and a white side chair and rug.
Here’s a little more detail on that spray painted table.
I started with this basic white metal table I picked up from Home Goods and picked out the Rustoleum Meadow Green after looking through the various green paint colors. Then spray painted it 2 coats to ensure the color would stick and be even. Then I let it dry outside about 30 minutes. Because it doesn’t take long in the Arizona summer heat to dry and cure!
I probably spent $100 total on the whole wall and got lucky to snag the palm frawns the day the tree climbers were out cutting the palm trees in the neighborhood for no more than a few prickles in my finger!
The palms started out as regular frawns off the tree. And I used scissors to shape them the way I wanted. And spray painted them with a copper spray paint to hopefully seal them and keep them like this for a long time. If you look close in the final photos, you will see another frawn behind the swinging chair. That one I used a glitter spray paint on and it just dusted the frawn with a gold glitter. And kept the green color. The exact color I used on the frawns was Pearl Champagne Pink, which makes these really pop!
More Feature Wall Ideas
boho feature wall
beachy feature wall
board and batten accent wall
modern accent wall
wood accent wall / wood feature wall
art deco accent wall
wall mural
sports-related feature wall
These are just a few accent wall ideas and architectural elements to get your brain flowing and thinking of what to do, you could also add this in an office space or dining rooms for adding wall colors to otherwise boring walls. Oh, and lastly, you don’t have to hire an interior designer, use your imagination and Pinterest to make your accent wall ideas come to life!
If you are like me, you usually find the perfect curtain in the most wonderful print or color but the length is wrong. No matter how many times you measure your window.
I always find the most amazing curtain that’s either too short or too long.
Never the right length.
Add in custom french doors and custom windows and the length will never be found in stock in a store. I wish our dining room was standard sized, but without looking standard.
So without needing to raise or lower the curtain rods every time you want to change the curtains, or putting a drop hem in by sewing the curtains, I came up with a better solution. Custom curtains.
I bought too long of curtains.
Well, I didn’t intend for them to be too long when I purchased, but it happened.
I had a really full cart already with 2 kids at Ikea and they were an impulse purchase, but one that I really liked. But in all honesty, I don’t ever mind a DIY project either.
Making the mistake to go to Ikea on a Sunday was the first issue. It was full of people and my Mom radar was on super high as I didn’t want anyone to steal them when I was too busy looking at the length of the curtains too long.
So I grabbed the first 3 panel curtain packets I saw, and went with it. These are the ones I grabbed.
I also thought that our windows and doors were at least 96 inches long… not remembering that we had custom heights for them making them take longer to get in during construction. (I don’t know how I could forget that)
Anyways, I got the curtains home, put them up, and realized that they are a good 8 inches too long…
I did what every person would do.
Contemplated taking them down, raising the curtain rod, and sewing them. We have to have a window treatment for the french doors that lead from the open concept kitchen and living room so these door curtains weren’t negotiable.
I also put up another set of curtains panels which are 64 inches and you can see in the photo they are too short.
Taking them down isn’t an option since we wanted to watch tv without a glare and shutting out the light at night.
DIY Curtains Without Sewing
Raising the curtain rod also entails fixing the drywall and having it repainted.
Both things we’ve done about 100 times now it feels like in this process. And it’s more expensive than purchasing all new curtains – so that’s also out.
With the pandemic happening and stay at home orders in place, taking them to get hemmed professionally are not options.
So, I took to Amazon to see if I could find some double sided fabric tape to make it work.
And thank goodness Amazon came to the rescue! The tape arrived in 2 days and I set out to fix them up using a diy no sew method. I have about 8 inches to hem to make them barely drag the floor, which I think will be fine.
Personally, I believe this will work with any curtain length – valance, kitchen curtains, cafe, longer curtains, etc.
Two rolls of this tape from Amazon should do the job. If you have fewer curtains, you may need less. If you have more, see how many it will take. Other options were available, but the shipping time was longer, and we couldn’t stand the curtains being so long anymore. Here’s my step-by-step process.
I simply laid the curtain across our countertop and put a towel under it to ensure I didn’t damage the butcher block. I moved the top edge out of my way in order to protect it as well. You can also fold the top to move it out of the way. If you have an ironing board, that probably works better. We don’t, so I improvised with what I had on hand.
And the other thing you need is an Iron. We borrowed one from my Mother In Law because we only have a steamer for our clothes.
I measured out how far I wanted to bring the curtains up from the bottom hem. In my case, that was 8 1/2 inches. I put the tape at about 7 inches so I could fold the fabric, iron, and cut a new hem. I made sure to measure from the top and bottom to ensure a straight cut on the raw edges.
After cutting the hem and realizing how much new fabric was left on the folded edge, I decided to cut the new line so it wasn’t as thick looking when hanging. I reduced the edge of the fabric to just a few inches.
Final Product: Perfectly Fit
The final product is a curtain that’s not dragging the ground and custom fit to your door/window!
I will play around with the lengths as our floors aren’t completely level. For me, each door and window will need a different length.
One note – cute doggie not included 🙂
Another note, my hubby decided he wanted to help with the project and didn’t heed my instructions to cut the extra fabric, which I did mention above, and you can see the reason. Look at Champ’s face and front area versus where is tail is. The extra fabric is a bit crazy!
If you don’t want to mess with curtains and you for sure don’t want to whip out the sewing machine, you can always check out window film as an option for a window covering. I have used window film on other properties that you can tie into the home decor. They work great as DIY curtains that don’t need washing, don’t ever get dirty, and don’t have a stretched rod pocket.
Hopefully this is something you find helpful and useful in your home when doing projects or redesigning your space.
Let me know in the comments if you have other ideas to make a curtain fit a space you have.
Christmas is not just about celebration; it’s about feeling joyous and peaceful from the inside. However, sometimes we end up complicating the festival only to be stressed in the end.
For instance, hosting a dinner for a lot of people might make everyone happy, but the host not so much, given that a lot goes into the preparation – the mental and physical exhaustion, and the stress? Don’t get me started on that.
That defeats the purpose of Christmas, doesn’t it? So how must one make it right?
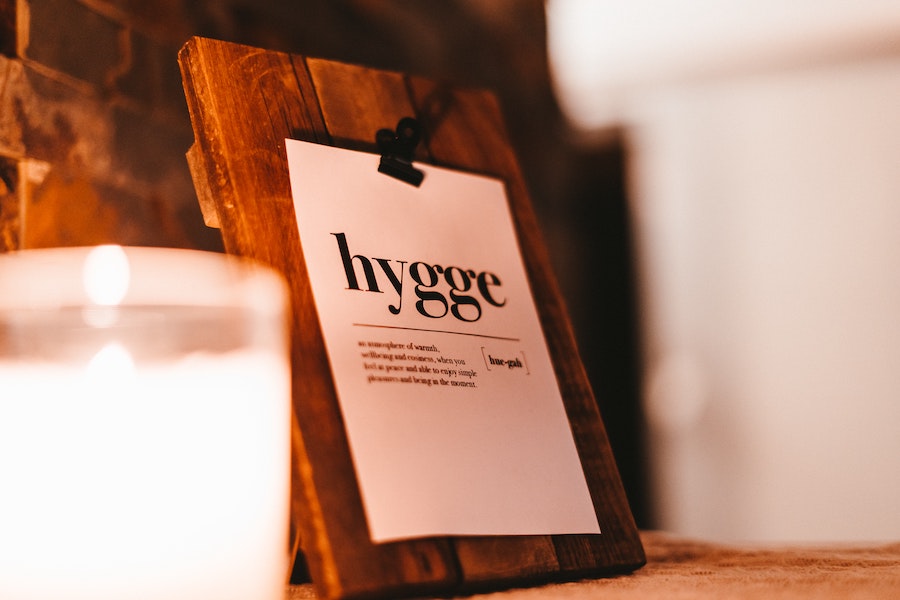
Well, going for HYGGE Christmas ideas is the answer. You can consider Hygge as the way of life that emphasizes simple, cozy, and comfortable living. In this article, I am going to discuss some of the ideas that would make you content from the very soul of your being. So, here’s to a celebration that makes you feel alive.
20 HYGGE Christmas ideas
1. Christmas yard camping
If you’re not all in for proper forest camping, you can definitely go yard camping for a night. There would be no problem with sanitization, food, or water– it will all make it very comfortable camping that you would genuinely enjoy. For us that live in warmer climates, this would be doable without having to worry about the cold and snow. You might need a heater for those living in colder climates.
2. Getting yourself Christmas themed snacks
Love snacks? We all do – So, why not pamper your taste buds with Christmas-themed snacks to make them feel like Christmas too. For instance, Christmas tree waffles, Santa cupcakes, cute Christmas cookies, and so many more. You can find plenty of recipes on Pinterest and YouTube. Our favorite is to make homemade chocolates into fun shapes and add sprinkles on them. But, if you’re too lazy to make them yourself you can even find plenty of options in the shops around you.
3. Making snow angels
If you have kids, this would perhaps be the most fun-filled activity for them. Make snow angels and snowmen; you can even decorate them with Christmas decorations to make them look like Santa. Again, if you live in a colder climate, this works but for those of us who aren’t able to do this unless it snows randomly.
4. Doing Christmas family photoshoots
Having Christmas photos in your albums is MANDATORY! Doesn’t matter if you click them every year – every Christmas is different. Thus, every Christmas has to have some memorable photographs.
5. Go to a local Christmas festival
If you’re blessed to live in a town that holds numerous Christmas events, like music concerts, movie nights, or even a “Meet the Santa” event, then go ahead. If you do not, you can still go to nearby Christmas events to have a great time with your family.
6. Go out for Christmas light-seeing
If you believe the beauty of Christmas lies in Christmas lights, this is something you cannot miss.
7. Making sweet family videos
Christmas videos can be great documentation for your kids when they grow up. In fact, you too can always go back to old videos every Christmas to relive the memories.
8. Pajama jamming
We’d all go to work in Pajamas if we could – you cannot deny, they’re most comfortable to wear. Thus, have a pajama party as a family – sing and dance your heart out.
9. Decorating the Christmas tree together
It’s a tradition we all love to be a part of, after all.
10. Doing Bonfires
A bonfire with some yummy snacks and a family to bond with! How can Christmas and winter get any better than this?
11. Keep the gatherings small. It’s better to restrict it to the immediate family.
If you want to keep it simple, and stress-free, go for a small gathering. Even if you need to visit somebody, do it before Christmas day.
12. Host a movie night
Movie nights can never get boring. However, if you do this all the time, you can perhaps invest in a projector to make it different this time – projectors can be affordable too.
13. Bake Christmas cake together.
We all love Christmas treats – but perhaps the most we love is Christmas cake! Not only eating is fun, but making it too. Only this time, do it with your family.
14. Talk about your lost loved ones. Keep them in your memory this Christmas
Our lost loved ones might not be here with us, but they are in our hearts. So, let them be a part of your celebrations – pray for them, say what you want to.
15. Play Christmas pickle
Trust me; your kids will enjoy this game a lot. It’s easy – just hide a pickle ornament in a tree. The first one to find it will get a gift.
16. Have a karaoke night.
Singing is always fun – doesn’t matter how you sound. Ergo, nothing can be more enjoyable than a crazy karaoke night.
17. Play a holiday puzzle
Puzzles are always interesting to solve. Only this time, you can do a Christmas-themed jigsaw puzzle with your family.
18. Tell Christmas stories
Going back to those memories is a sheer delight after all. Tell your family all your crazy Christmas tales!
19. Make a Christmas card for each other.
It’s the sweetest thing you can do for Christmas!
20. Lastly, share some laughs together
There’s no Christmas without laughter! So, feel free to share some jokes, make each other laugh – make the night memorable and worthwhile.
This is it. This is the recipe for a simple yet fun-filled Hygge Christmas time! Which one would you pick? Feel free to let me know in the comment section. Merry Christmas!
Everything about Christmas is worth smiling and being happy about. The Christmas lights, decorations, carols, gifts, and whatnot. However, there’s still one exception that can make you sweat despite the merriness and joyfulness of Christmas – The expenses. Christmas can mean overspending.
But not anymore! Wondering how? Read along to find out.
30 smart tips to save money during Christmas
1. Gift experiences
You cannot always gift materialistic things, you can also gift experiences. For instance, a go-kart experience for your kid! This is my number 1 ask of people gifting our girls, not just for Christmas, but for everything! An experience and time spent with the gift giver is far more important a memory that will last much longer than the toy or clothing item ever will!
2. Regift
Have a lot of gifts that remain unused and unopened? Feel free to gift them away. There’s no shame in that. As someone who always gets a ton of extra PR gifts I can’t ever use, this is one of my favorite ways to gift. I usually don’t open the item, or if I do, it’s carefully and barely used. It’s the perfect way to gift someone something that would normally sit around and take up space collecting dust!
3. DIY gifts
You can make Christmas cards, mixtapes, cookies, and cakes to gift someone. Even handmade cards are great DIY gifts!
4. Send out E-cards
Some websites allow you to do that for free! A few I found and have used before include 123cards and JibJab.
5. Make use of coupon codes and cashback
Don’t let them sit idle. The same goes for gift cards! These are money baby and you can use them just as you would use cash!
6. Shop Christmas essentials on Amazon
Retail stores tend to loot customers with heavy prices during the Christmas season! Instead, shop on Amazon.
7. Buy Amazon gift cards
Let people decide on their own what they want this Christmas. This works amazing for people you don’t know so well, or those who are extra picky! You can also get amazing deals if you buy them constantly throughout the year.
8. Pay attention to money-saving deals
Don’t turn a blind eye to deals that can help you save bucks. Watch out for sales, offers, and deals. Don’t hesitate to shop beforehand if you find a good deal.
9. Don’t shop last moment on Amazon
You might have to pay extra shipping fees to get the purchases sooner if you place the order late during Christmas days.
10. Shop on Dollar trees
Dollar trees are discount variety stores throughout the USA and Canada. You can get good products for as low as $1.
11. Save wrapping paper
Got a gift? Don’t just throw away the wrapping paper. Instead, open it with ease to use it again.
12. Go for wrapping paper alternatives
Don’t have used wrapping papers? No issue, you don’t need to buy new ones when you can settle for thin wrapping rolls or brown paper rolls. You can also decorate them with stickers for aesthetics. A fun thing which became popular last season was the Japanese style of gift wrapping called furoshiki, which uses fabric to store, carry, and wrap things. They are a specific size, but you can google the size and use any fabrics, or scarfs you want to gift or have on hand as the gift wrapping. It becomes a gift that keeps on giving!
13. Shop cheap Christmas tree decorations
If you are not at all in for using old Christmas tree decorations, at least do not buy decorations from high-end craft and stationery stores. Instead, buy them from the Dollar Store! You’ll get them at dirt-cheap prices and they have cute options always!
14. Save on dinners
If you are hosting a Christmas dinner, try to encourage your guests to bring one dish per family. There’s no shame in that – the wise ones will understand the stress and hard work one has to go through during dinner preparations. This also gives those of us who don’t always cook the ability to contribute something to the table when we otherwise wouldn’t be asked.
As Amazon reserves some portion for itself for every sale, some sellers on Amazon list their products higher to make up for their loss. Thus, you can get the same products cheaper at the seller’s website. You can also do a free store pickup or free shipping if you get it direct from the store versus on Amazon.
18. Go to a mall for a Santa experiences
If your kids love Santa, there’s no need to hire one for them. Instead, take them out to a mall. Malls have Santas dressed up to entertain kids for free.
19. Head to Shutterfly for coupon codes
If you’re looking for great money-saving deals, you can rely on Shutterfly coupon codes. Just register on the website, and you can get amazing coupon codes from time to time.
20. Stop gifting adults
Just ask yourself, how many gifts that you got during the years on Christmas remain unused? I bet there’d be plenty. But that’s not just you. So, stop gifting adults if your acquaintances share the same mindset. If you do decide to gift them, maybe a small gift card and a coffee cup is sufficient. Nothing extravagant is needed.
21. Go for boxed Christmas cards
You can find such boxes in Target. Since they are in bundles, you can get several for cheap. You can continue using them for years if you still have some left to give. These take up less time and energy, thus maybe you will get them in the mail on time!
22. Gift meaningful gifts
Instead of shopping for something expensive for someone, gift them something meaningful. For instance, if your partner loves reading books, gift them one. A gift card to their favorite store is also a meaningful gift that shows you care.
23. Buy an affordable turkey beforehand
You don’t have to buy one from a lavish store. Don’t fall for the packaging and store aesthetics. Especially this year, the shortage of many things will cause for increased prices and higher demands, therefore shop early!
24. Book tickets in advance
Have to be elsewhere for Christmas? Book your tickets beforehand – before ticket prices soar to new heights during Christmas. A little note about this one — have patience and understanding as many people in the service industry are overworked and getting very little pay.
25. Don’t borrow on Christmas
If you can manage the expenses through savings, don’t add loans. You’ll also have to pay interest. The same thing goes for spending all of your paycheck and not putting anything into savings like other months. Now is not the time to skip on your future!
26. Do a secret Santa
Doing a Secret Santa means buying gifts for one person – not everybody. Hence, lots of money-saving. Another tip is to set a limit on the amount spent for the person. It allows people to get creative with their gift giving or to let people pick one gift for that dollar amount.
27. Start money-saving early and create a reserve
Reserve a little money for Christmas every month to prevent the financial blows later.
28. Invest in an artificial Christmas tree
They are cheaper and they won’t destroy the Christmas vibe, but help you save money. Plus, they don’t make a huge mess and require watering, adding to the stress of Christmas.
29. Find local events
If your locality happens to host free events, don’t think twice. Ditch the fancy day-outs. Growing up, the Christmas parade was something we looked forward to each year. We got to see cool floats that threw out candy and it always ended with Santa on the sleigh. We then got to go sit on his lap and get a bag of goodies and tell him what we wanted. Give those same memories to your kids.
30. Lastly, Save for next year
I know it’s a little too early, but hey starting early can help you save more.
Merry Christmas! If you happen to try these tips, let me know how they work out for you in the comments below. Have a great time this year!

 designs. In this blog post, I’ll share my experience with peel-and-stick wallpapers, introduce you to Spoonflower, and showcase five of my favorite wallpapers from their collection.
 and vibrant atmosphere, Spoonflower has something for everyone.
 calming vibe.
 design.
 design.

 belongings and consider donating or selling items that you no longer need or resonate with. This step not only helps you clear physical clutter but also declutters your mind, allowing you to focus on the new vibe you want to create. By letting go of unnecessary items, you’ll have more space to curate a cohesive and intentional aesthetic.
 impact on the overall vibe of a room without breaking the bank. Look for affordable options like decorative pillows, rugs, curtains, artwork, or plants that complement your desired aesthetic. These small additions can inject personality and create the desired ambiance, tying the entire room together.
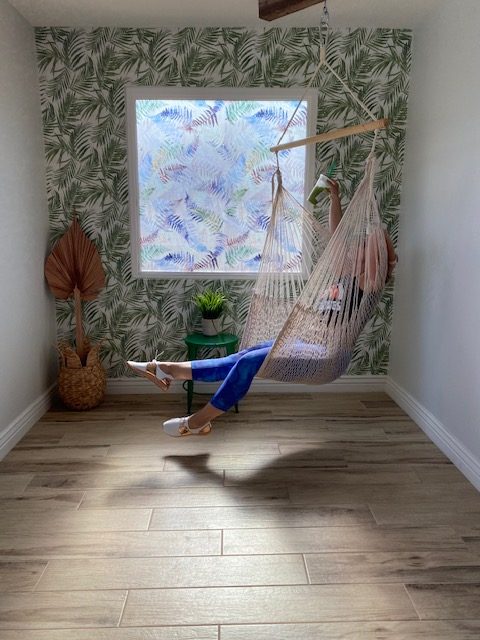


 make them feel like Christmas too. For instance, Christmas tree waffles, Santa cupcakes, cute Christmas cookies, and so many more. You can find plenty of recipes on Pinterest and YouTube. Our favorite is to make homemade chocolates into fun shapes and add sprinkles on them. But, if you’re too lazy to make them yourself you can even find plenty of options in the shops around you.
 tales!
 your kid! This is my number 1 ask of people gifting our girls, not just for Christmas, but for everything! An experience and time spent with the gift giver is far more important a memory that will last much longer than the toy or clothing item ever will!
  as $1.
 shame in that – the wise ones will understand the stress and hard work one has to go through during dinner preparations. This also gives those of us who don’t always cook the ability to contribute something to the table when we otherwise wouldn’t be asked.
  partner loves reading books, gift them one. A gift card to their favorite store is also a meaningful gift that shows you care.
  tip is to set a limit on the amount spent for the person. It allows people to get creative with their gift giving or to let people pick one gift for that dollar amount.
Recent Comments